The following post details how to set up and shoot a good quality interview with the equipment we have available at The Delta School. It can be a pretty tricky process at first, but once you get the general rules down, it’ll be smooth sailing!
Materials
- 2-3 Cameras & Tripods
- Camera Batteries & Chargers
- 3 Filmmaking Lights
- A Zoom Audio Recorder
- A Backup Audio Device
- Lapel Mic
- SD Cards
- Wires for plugging the lights in
- Extension Cord (if necessary)
Before the Interview
- Charge the camera batteries so that you have plenty of time to film. It doesn’t hurt to take a few extra just in case!
- Make sure that the SD Cards you plan on using have enough space to hold your footage. Delete any outdated footage and audio. If there are things that you wish to keep, move it onto a desktop and then delete it from the SD Card.
- Arrive early at the interview site and set up the equipment before the interviewee arrives. Allocate enough time beforehand for this purpose.
Using the Cameras
- First, you need to insert the batteries and SD Cards to ensure that everything is working fine. If something’s going to go wrong, it’s better that it happens before the interview than in the middle of a great conversation.
- Next, you should attach the cameras that you’re using to tripods and position them in 45° angle increments of one another.
- After that, you’ll want to sit your interviewee down to see how the subject looks on camera. You can adjust the settings on the camera by switching it to manual via the switch on the top. I wouldn’t suggest it, however, as most of the same settings can be applied in post production later on. Keeping it on auto should be fine.

4. With your interviewee sitting down, you can mess with different camera angles until you get the shots that you like. Typically, you’ll at least want both a close up shot and a medium shot. The close up shot consists of the subject’s head and shoulders, while the medium shots are from the waist up. If you don’t know the rules of framing shots, I’ll include a video below that details the process.
5. Finally, you can begin recording. Don’t be afraid to pause the interview for a short time if you need to change camera angles or remove obstructions!
Setting up the Lights
- First, attach the lights to their stands by tightening the knobs at the neck. Adjust the height of the stands until you get them at a comfortable place where the interviewee isn’t blinded, but is still well illuminated.
- Next, position the lights using the three-point lighting system. This includes positioning a light behind the subject, which is called a back light. You’ll also need a light to the side of the subject, which is aptly dubbed a side or fill light. The final light is the key light, which is usually positioned behind the interviewer’s shoulder. When combined, these lights really make the subject pop out in the frame.

3. After that, you need to plug the wires into the back of the lights and attach to outlets or an extension cord (recommended). On the back of the lights, you can adjust the intensity so as to make it brighter or dimmer. This can be used to portray emotion to an audience.
4. Finally, check the cameras again to make sure that the lights aren’t reflecting off of any surface and the subject still looks good. Make changes to the lighting composition as necessary.

Getting Good Audio
- First, you need to plug your lapel mic into the Zoom Recorder. You do so by pressing down on the metal switch at the bottom and firmly pushing the mic in.
- After that, you’ll need to switch the audio to the correct microphone. By default, it’s usually using its own mic. To change this, select 1 or 2 using the buttons on the left side of the front based on which chamber you inserted the mic into.
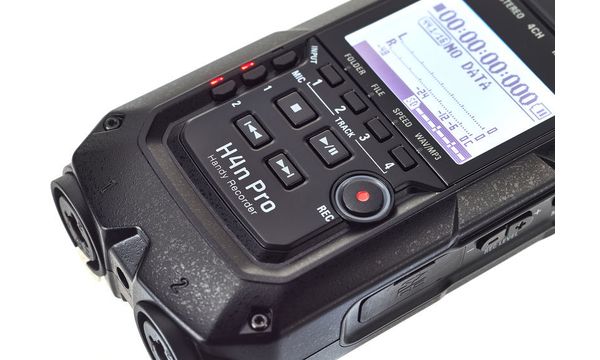
3. Next, ask the interviewee to run the lapel mic up their shirt and clip it to their collar. Plug headphones into the Zoom, put them on, and listen to the interviewee speak. If all is good, then you should be ready to go.
4. Finally, you can start recording by pressing on the big red button on the front twice. To stop recording, you press the square stop on the front. To be safe, I’d advise you bring something to record backup audio, such as an iPhone. You should also frequently check the Zoom device to make sure it’s still recording.
If you’ve followed these steps, you should be on track to film great interviews! Best of luck!
