The intersection between film and CNC milling?
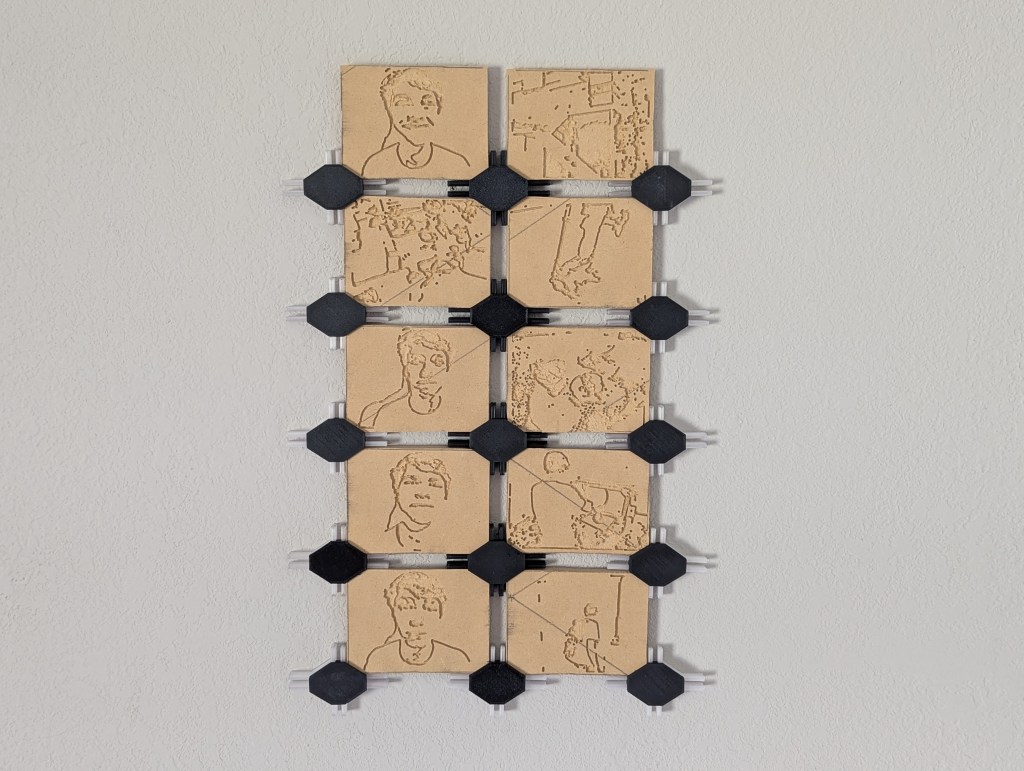
Me and Ian wanted to explore this combination by taking advantage of our Shapeoko 4 CNC as a tool to translate a 2D medium to a 3D medium. We made a short 10 frame film and made 2 changes that explored 3D properties. First we made each frame physically 3D, secondly we made each frame re-arrangable besides the start and end to make a new unique story at will.
This proved signficantly more difficult that we first thought. Both on Ians end of the job and mine, here in this article I’ll break down the project from a CNC perspective, Likewise Ian will break down the project from a film perspective. You can find his article here, I highly recommend it, go take a look!
The first challenge was getting the photos from Ian into a CAM software. I wanted to use Fusions built in CAM workspace and while doing some research found a neat Fusion plugin called Image2Surface generates a mesh from an image. This showed promising results since I was able to run some toolpaths on the resulting mesh but becuase of the way the plugin works the 3d geometry of a few of the images were’nt accurate. To fix this we converted the photos into normalMaps and uploaded those images instead.
Image2Surface – Github Repo
NormalMapOnline – Website
The second challenge was to prepare the 3D photos for CAM. With the original settings the images were just so computationally intensive on my computer I had to find a way to reduce the image. Because I was creating a 3D mesh in Fusion from these photos the resolution is determined by the amount of polygons in the mesh. This value can be configured, and at first I was only consolidating 5 pixels on data, by the end I was consolidating 45. The resulting model was much easier to work with, this allowed me to use Rhino 8 to extrude the base of the mesh and boolean union the mesh to a rectangualr prism placed around the mesh which I could work with in Fusion CAM as my stock.
The new model is re-imported into fusion and converted to T-splines from a quad mesh. I realize now looking back I could have avoided using Rhino and instead made a rectangle in fusion, then extruded it upwards into the T-splined 3D image with the “to-extent” option selected in the extrude dialog box ![]() .
.

Rhino 3D – Website

The third challenge was generating the toolpaths for the now prepped files. I started with the 3D adaptive clearing and tried the same process as documented in my tutorial article.
This really slowed down my computer and wasnt the most efficient so I tried generating the parallel and 3D pocket clearing which had promising results although even with a 60deg 1/32″ ball point I wasnt able to get a distinguishable level of detail. Because of this result It wouldnt be fair to Ian if you wouldnt be able to tell what any of the frames were so I modified my approach.
I tried to vectorize the image and then attempted to simplify the image in Illustrator. With this partly simplified image I couldve threw it back into Fusion CAM but I chose to instead use Carbide Create since image toolpath generation is very very simple. This worked to some degree but some of the 3″ x 4″ frames were still difficult to interpret. I shared this with Ian and we agreed to just run the operation.

Adobe Illustrator – Illustrator Pricing
Carbide Create – Downloads

The cut itself went relatively well, it took significatnly longer than expected even at 150% feedrate. I think 10 frames took around 2 and 1/2hours, which was way longer than the estimated cut time. Unfortunatley 3 of the frames are completely unrecognizable, the rest cut fairly well.
Now with all of the frames complete it was time to assemble the final peice, I modeled some frame mounts in Fusion and 3D printed the base in PETG and the cap in PLA. Then just pressed a magnet into each cap. This makes it easier to remove the caps without unscrewing a mount form the wall to move the frames around as desired.

Overall I gained some valuable experience in passing 2D things through 3D processes and picked up some new film knowledge I probably wouldnt have otherwise. Experimenting with how film could be modified with the benefits of an extra dimension was also interesting food for thought, and I now know how I would redo this intersectionality to explore that in a new perhaps better way.
A quick aside, if your curious about intersectionality my other classmates expiremented with the meeting point between Crochet, 3D printing, and Autodesk Fusion. – You Can Crochet Onto 3D Prints?

One thought on “Transforming 2D Film into 3D Art with CNC Technology”