
This week, I was faced with the challenge of finding a way to combine crocheting with 3d printing! As you will most likely be able to tell from their respective titles, these processes/mediums are extremely different.
For one, crochet is made with a flexible and forgivable material that moves as it is worked with: yarn. 3d printing is rather rigid as once the plastic is set, there is no moving it. When you complete a model to be 3d printed, you have to be pretty sure of your design as there is no way to go back a step and change an element of your model without reprinting the entire thing. There is no way to “back-stitch.”
Due to the difference in materials and concepts, I had a hard time creating an idea that would combine the mediums. Originally, I thought I could simply have a crochet hook be 3d printed and then crochet with that, but that was not innovative and it did not truly combine the processes as it was simply making a tool to crochet. Then it hit me as I thought about the nature of a granny square.
I recognized that granny squares are able to have their color changes as you work in the round. Therefore, they make individual circles all within one project. What if I was able to 3d print 2 of the sections and then crochet in between them rather than creating the whole thing out of yarn? I knew this idea would be just out there enough to create something innovative out of different materials.
I knew Levi and Ryan, my friends and classmates, would be the perfect people to work on this project with! Levi is the Resident Expert of CAD Modeling at Arkansas Makers Prep, so I knew he would be able to find a to design a crochet-able ring out of plastic and Ryan is the 3d Printing Resident Expert so I knew he’d be the perfect guy to 3d print this project.
With Levi’s first model, the gaps between the design and the loop for crocheting were too small to be able to fit a crochet hook between. The thickness was correct though as the plastic had the same depth as crocheted yarn. After we discovered this, he made some modifications and Ryan went to 3d print it again.
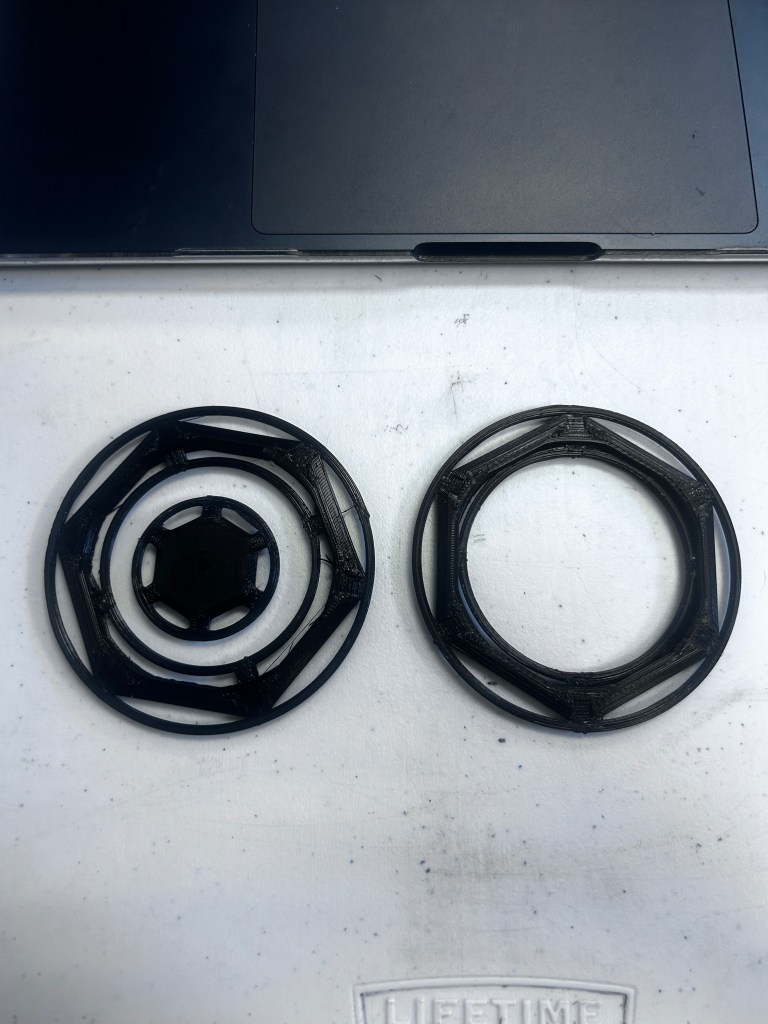
Before Modifications

During Printing
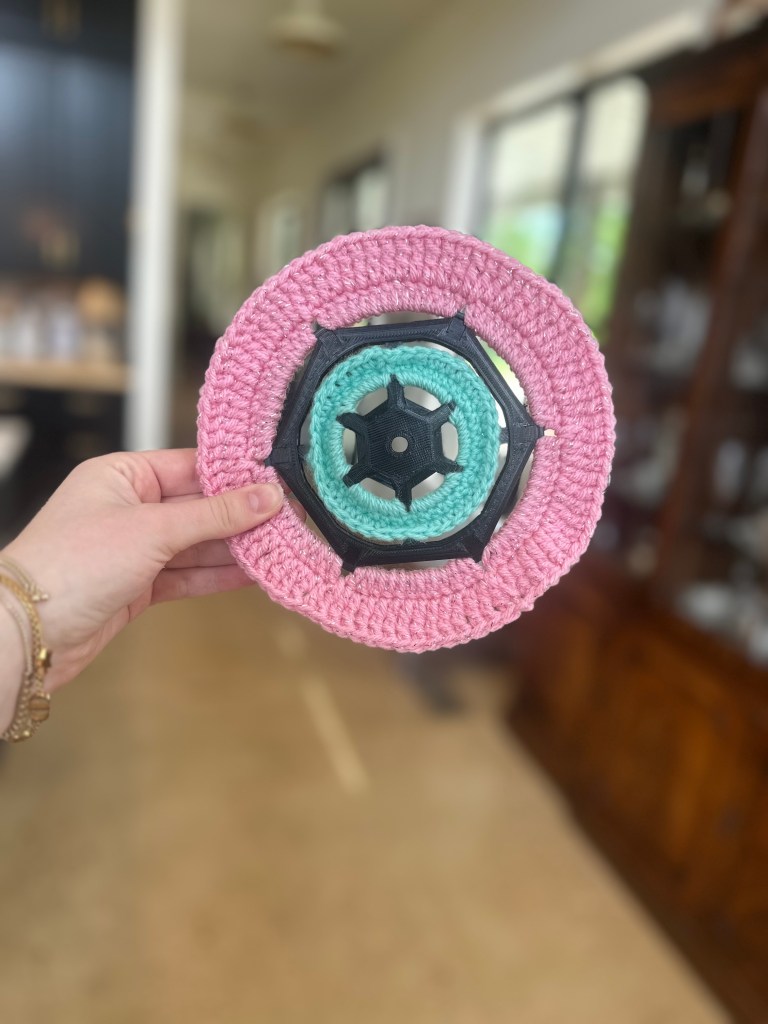
Once the prints were finished, it was time for my task of crocheting them together. This proved to be more difficult than I originally assumed. Although we modified the plastic to be able to fit a crochet hook between the plastic gaps, it was still a tight fit. I struggled with crocheting the initial teal yarn the most as I had a very small amount of room to work with. The last round of this section proved to be the most difficult, so I had to use an unconventional method of crocheting to go about it. Rather than inserting my hook from the front of the piece, I went from behind to able to fit through the hole and grab enough yarn to pull through. Later, I realized that I could crochet through the front anyway if I allowed enough slack in the yarn to be able to reach and feed the yarn through the gap.


Once I finally had the inner most crochet completed, I could move on to the much easier outer ring. Without having to crochet in between to surfaces, I had a lot more room to work with. Originally, I was going to make the outer ring a square to more closely resemble a granny square, but this proved to be not very feasible due to the circular nature as well as the plastic not allowing the square to be blocked. Crocheting on plastic allowed me to broaden my crochet horizons as it forced me to work with a new medium outside of my comfort zone. Using this experience, I will be able to crochet around a plastic mold, figure, etc to further innovative with my crochet. Maybe one day I can make a plastic x amigurumi figure! I’m glad I got to work intersection my work with Levi and Ryan! You can find their articles here: Levi Ryan


2 thoughts on “You Can Crochet Onto 3d Prints?”