3D printing is amazing, but if you’ve ever had a print fail halfway through or a part not fit together correctly, then you know it’s not just a matter of hitting “print” and crossing your fingers. A lot of 3D printing is really about what happens before the printer gets going, it’s all about good design.
So Really, What Does “Designing for 3D Printing” Even Mean?
If you want to make something to 3D print, you need to design it in a way compatible with how those printers build things up in layers. That leads to some fascinating possibilities, and also features to be cautious about.
Overhangs and Supports
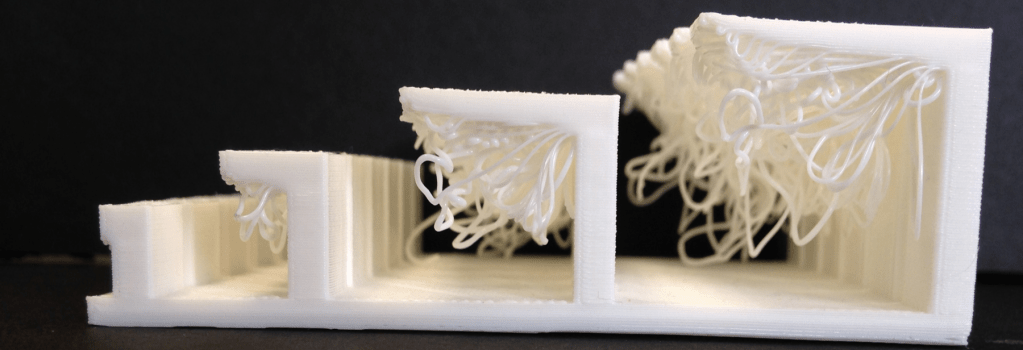
If your model extends a little too far, your printer may need to print supports underneath. Those supports require time, use extra filament, and can be a hassle to clean up later. So I try tapering things when I can, just to keep them minimalized.
Wall Thickness = Strength
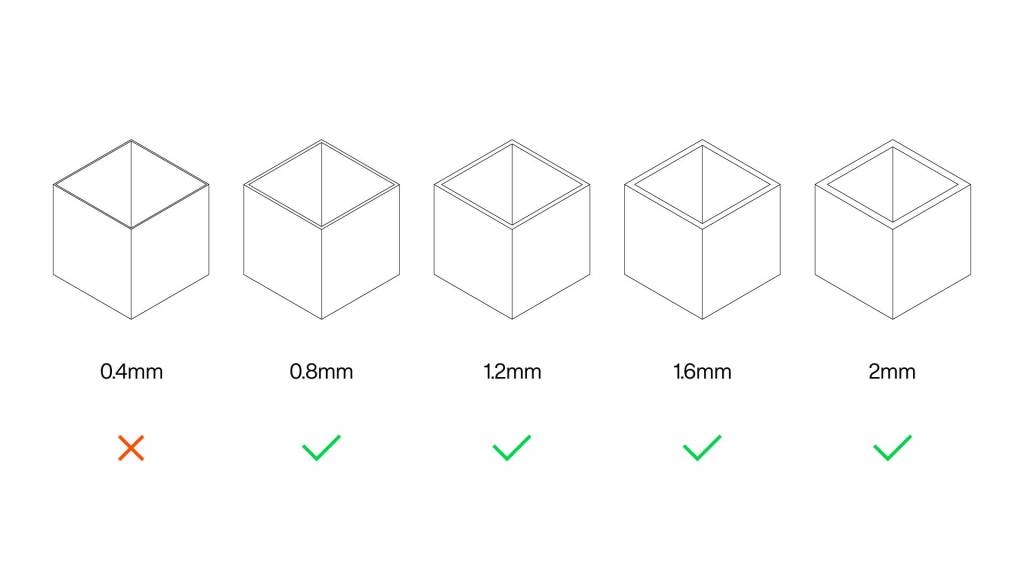
Thin walls also look cool, but they could also be weak or unprintable. When I’m making something, I generally keep my walls a minimum of 1 to 2mm thick. It strikes a nice balance between detail and durability.
Making Things Fit Together (Tolerance)
When I’m designing pieces that should snap or slot together, essentially gears or pegs, I have to leave a little bit of mounting space. That would be the “tolerance” of that space, and if you didn’t get it right, the parts wouldn’t fit the way you were hoping they would.
Orientation Matters

How your model is oriented on the print bed can have a huge effect on the strength or appearance of the print. I always consider which angle will give me the best strength and least visible layer lines.
Why This All Matters
It may sound like a lot, but believe me, considering this stuff before printing is going to save you a lot of time and headache after! You use less filament, your prints are cleaner, and when you press “go” on your projects, they don’t end up as failed experiments.
Air Hockey Scoreboard, A Practical Example
This custom Air Hockey Scoreboard was one of my favorite builds. I kept the score, drawing up plays on a Battleship-like system, where I used pegs to track the score. Each peg stood for a different tally mark, red for 1 point, blue for 5 points, green for 10 points and so on. I also included a drawer to hold all the pegs when they weren’t in use to keep everything organized. It may sound simple, but figuring out how to get those pegs to fit, to how to make the drawer slide easily and keep everything functional, involved a lot of behind-the-scenes design work. That’s the kind of detail that can take a project from, oh, that’s fine, to, oh, I am actually proud of this work.
Whether it’s something as simple as an Air Hockey Scoreboard or a more complex project, taking the time to nail the details is what really makes the difference. So, next time you hit go, just remember, it’s not all about the print itself, but how much you worked to get to that point
